You might know already that there are plenty of free and paid solutions to migrate a website from one server to another.
I have used All in One WP Migration plenty of time already and it works like a charm.
So why would you complicate your life transferring a site manually when you can use a plugin?
My two reason for backing up and migrating a site manually are:
- Plugins often add unnecessary files, logs, or configurations.
- Performing a manual transfer can be a great way to deepen their understanding of how WordPress works.
Yes, I like using zero plugins if that’s possible and that’s the case now that when I am working locally.
I also like learning new things and how things work so I can make more better decisions.
For instance, if you haven’t added new themes, plugins, mu-plugins or any type of files to your installation, you can get away with keeping an old version of your wp-content folder and use a recent backups of your database.
I make full-site backups only when it is necessary.
By the way, there is nothing wrong with using a plugin to back up and migrate your site.
If you want to be quick and be done with a migration as soon as possible, you might want to use one.
Here is what you should know to back up and migrate your site without a plugin.
Making a Backup of Your WordPress Website

Everything starts with a backup of your WordPress website.
Keep in mind that there is no need to migrate every file of the installation.
By default WordPress has three folders:
- wp-admin
- wp-content
- wp-include
The installation also has several PHP files like wp-config, xml-rpc and files such as license.txt, readme.html.
You just need wp-content folder since that folder contains your plugins, mu-plugins, uploads and themes
So just download the whole folder using CyberDuck, FileZilla or your hosting file explorer.
The rest of files will be part of every new installation that you are going to migrate your site to.
The next thing that you need is the database since in it, you will find your posts, user or users, post_meta and other key information.
You will find that most sites use phpMyAdmin or Adminer
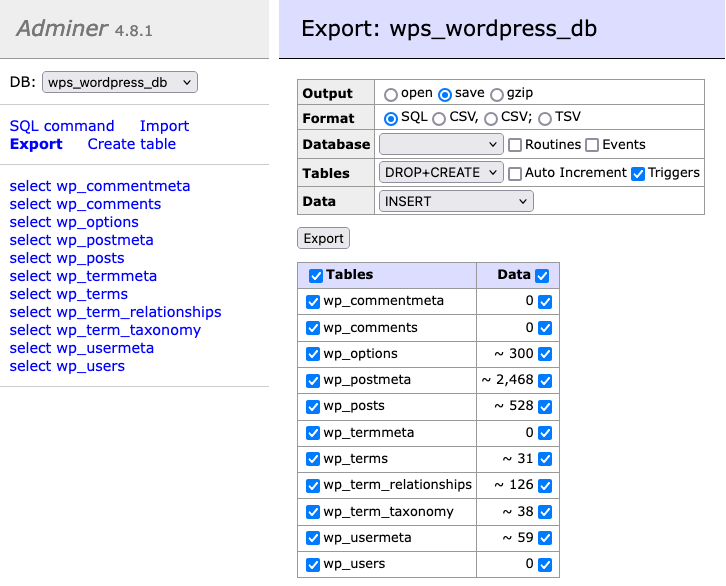
Cloudways uses Adminer and the process to make the database backup doesn’t take more than two clicks
Click on export and then choose “save” as output and “SQL” as Format.
And click “Export”

That’s all you need to take Your WordPress site elsewhere.
The only reason to do something different would be if you have some custom files or folders which is rarely the case for most users.
How to Migrate your WordPress Site
Now you need to create a WordPress site on the new server.
Once that fresh WordPress site is ready, delete the wp-content folder and replace your wp-content’s folder.
Half the job is done now.
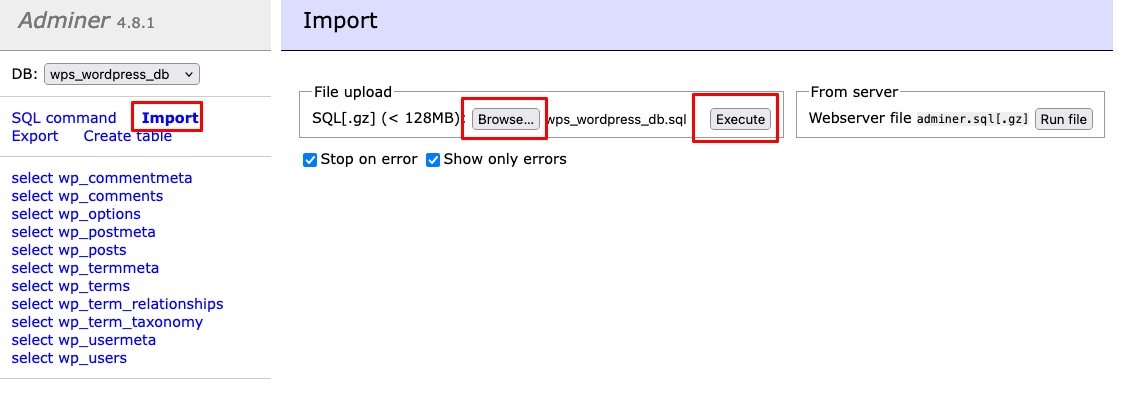
Now you have to go to the SQL administration interface and import your database.
If it is Adminer.
You just have to import, click on the browse button, locate the file and execute.

If you are using the same domain, you won’t have to do anything else, just point your domain to your new server and check your site again.
If you are moving a WordPress site and you are going to use a new domain for it.
You will have to search all instance of the old domain present on your database and replace them with the new domain.
This is probably the reason why many don’t want to migrate WordPress sites manually.
SQL Commands
Here are the SQL commands you should run:
Updates the home and siteurl options in the wp_options table to use the new domain
UPDATE wp_options
SET option_value = replace(option_value, 'https://old_url', 'https://new_url')
WHERE option_name = 'home' OR option_name = 'siteurl';
Update the guid in wp_posts
UPDATE wp_posts
SET guid = replace(guid, 'https://old_url', 'https://new_url');
Update the post_content in wp_posts
UPDATE wp_posts
SET post_content = replace(post_content, 'https://old_url', 'https://new_url');
Update the old domain in the meta_value field of the wp_postmeta table.
UPDATE wp_postmeta
SET meta_value = replace(meta_value,'https://old_url','https://new_url');

