In this post, I will tell you how to place anchor ads on your site using GeneratePress and GP Premium Elements
If you are using Adsense, you will find options to enable anchor ads on the mobile and desktop versions of your site
To be honest with you, I don’t like the size and how those anchor ads look.
So let’s check how to place anchor Adsense ads using GeneratePress.
Table of Contents
How to Place Anchor Ads in GeneratePress
My recommendation is to place anchor ads if you wanna increase your earnings,
Anchor ads are one of the top-performing units according to my tests.
#1 Activate Elements on GeneratePress
The first thing that you have to do is activate GP Premium and activate the elements sections.
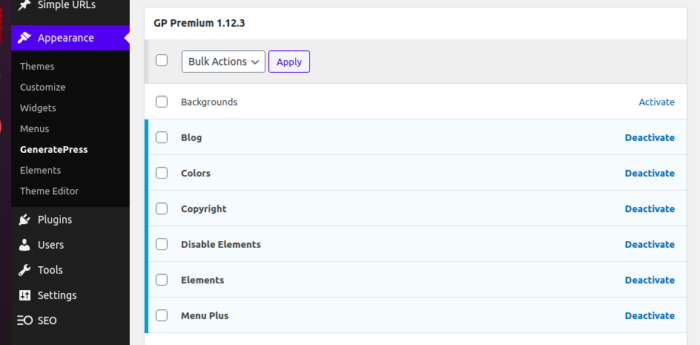
Now that you have that ready, go to the elements sections.
#2 Create Ad Units
Go to your AdSense dashboard and create an ad unit so you can track how well this unit performs.
The code for that ad unit is gonna look close to this if you chose the fixed type.
<script async src="https://pagead2.googlesyndication.com/pagead/js/adsbygoogle.js"></script>
<!-- WPSurfer -->
<ins class="adsbygoogle"
     style="display:inline-block;width:300px;height:250px"
     data-ad-client="ca-pub-xxxxxxxxxxxxxxxx"
     data-ad-slot="xxxxxxxxxx"></ins>
<script>
     (adsbygoogle = window.adsbygoogle || []).push({});
</script>
It is important that you don’t recycle existing ad units, so you can see how well these ad units perform on your site.
#3: Add Elements on GeneratePress
These are the steps to insert the code to display anchor ads on the mobile and desktop versions of your site.
Go to the element section from GeneratePress and:
- Add new element
- Choose “hook” among the available options
- Click on “Create”
- Name the element
- Use the code below
<div class="grid-container anchorads">
<style>
.ad_A { width: 320px; height: 50px; }
@media(min-width: 800px) { .ad_A { width: 728px; height: 90px; } }
</style>
<script async src="https://pagead2.googlesyndication.com/pagead/js/adsbygoogle.js?client=ca-pub-97979797979797979"
     crossorigin="anonymous"></script>
<ins class="adsbygoogle ad_A"
     style="display:block"
     data-ad-client="ca-pub-9797979797979797"
     data-ad-slot="9797979797"></ins>
<script>
(adsbygoogle = window.adsbygoogle || []).push({});
</script>
</div>

<style>
.anchorads {position: fixed;bottom: 0;left: 50%;transform: translateX(-50%);width: fit-content;height: fit-content;}.anchorads ins.adsbygoogle {display: block !important;}
</style>
Replace the numbers with the numbers from the ad units you generated in step #2
By the way, the code was taken from the official Adsense website.
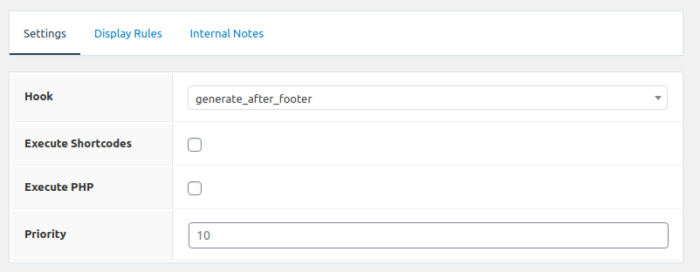
Fourth Step: Choose Where to Show ads
Now choose where to show the ads, go to settings and choose “generate after footer”
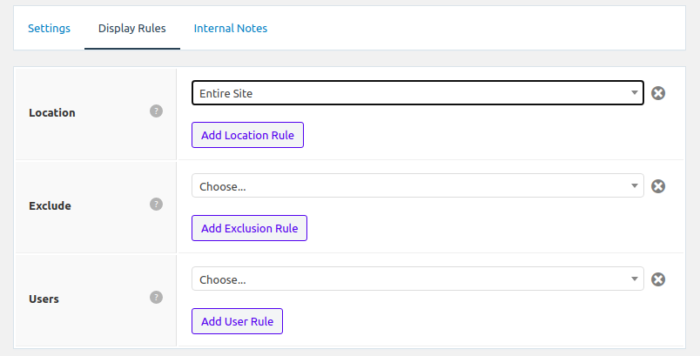
After that, go to the display rules tab and choose where you want the ads to show. Y
ou can choose the entire site or all posts.
You can also exclude posts and pages
Now you can publish the element
Results: Anchor Ads on Mobile and Desktop
This is what you are gonna get on your desktop when you follow these steps:
And this is what you get on mobile.

Thanks to GP Support Team
I am really grateful to the GeneratePress support team for the instructions on how to do this.
Consider buying GP Premium and GenerateBlocks Pro.
Information about Using Sticky Ads
I think this is a good use of sticky ads. I recommend watching this video.
Make sure that the sticky ads don’t cover the content of your site
More Posts about Monetization
These are some posts that I have written about monetization in case you wanna learn more about how I monetize my sites using Adsense and Ezoic
- Best Ad Placements on your WordPress Site
- Ezoic vs Adsense: The Final Battle
- How to Place Ezoic Ads with Ad Inserter


![How to Optimize GeneratePress for Core Web Vitals [100% Solved]](https://wpsurfer.com/wp-content/uploads/2021/06/Optimize-GeneratePress-for-Core-Web-Vitals.-300x169.jpeg)